Introduction to blueprinting
Blueprinting is a collaborative process where multiple users can design and modify workflows on a shared canvas. It allows for the creation and organization of various elements like pages, modals, and APIs, streamlining development and team coordination.
About Blueprinting
A blueprint serves as an expansive canvas for designing workflows, where various blocks can be arranged to create distinct flows. Each blueprint is typically dedicated to a specific component, such as a page, modal, API, or a set of (public) functions, mirroring the practice of assigning a single class to a file in traditional coding. These blueprints can encapsulate diverse elements, from state pages to scheduled events invoking functions from other blueprints.
Blueprinting supports collaborative development, allowing multiple users to work on the same blueprint simultaneously. Team members can enhance clarity by adding comments, grouping blocks with custom titles, and copying blocks between blueprints as needed. Furthermore, RUAL ensures comprehensive audit logging of all activities, including blueprint modifications and block interactions, providing an automatic and continuous record of changes, like git commits, but with real-time collaboration.
Navigational Techniques
To streamline navigation within blueprints, you can employ the following methods:
- Utilize your mouse scroll wheel to zoom in and out of the current location.
- Use your trackpad, if available, to pinch and zoom within the blueprint, which is particularly efficient on devices like a Macbook Pro.
These techniques facilitate smooth navigation and exploration of your blueprint.
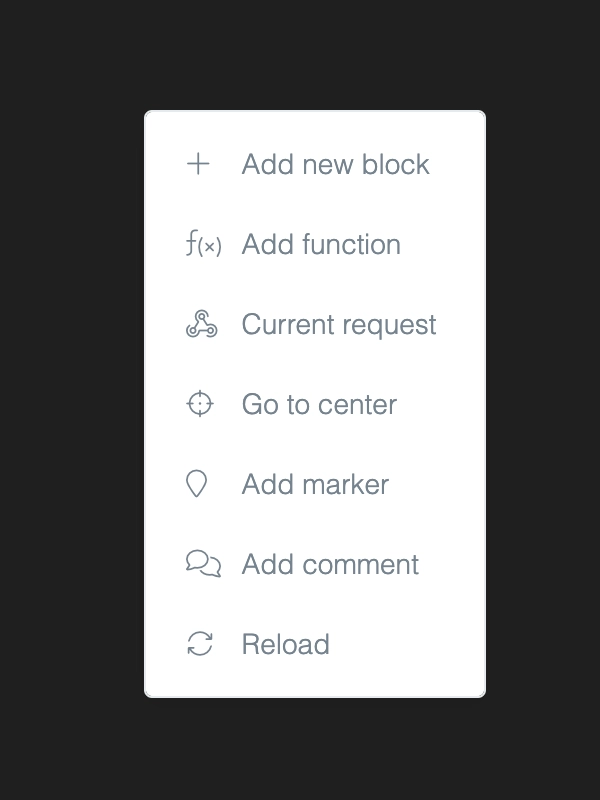
Context Menu
The default context-menu in RUAL Studio, accessible via right-click within a blueprint, offers several options for enhancing your workflow:
Add new block: This option allows you to quickly create any block at any location, regardless of the pin type. Simply type the name of the block you need after selecting this option.Add function: This adds a new, blank function block, enabling the easy creation of functions anywhere in the blueprint. Functions are private by default.User guid: This generates a unique identifier (GUID) for the current user, allowing it to be used elsewhere in the blueprint.Go to center: This centers your view on the blueprint. You might need to zoom out if the view is still zoomed in.Add marker: This places a marker at your current position, useful for collaborative work in the same blueprint. A sound plays upon adding a marker.Add warning: This allows you to add a warning sign to prevent unintended changes when collaborating on a blueprint.Add comment: This allows you to add a comment at your current position. You can type your comment directly into the newly added block.Reload: This refreshes the current blueprint view, useful for resolving display issues that sometimes occur due to browser behaviors like auto-input focus.
Top bar: options
At the top right side of your blueprint, you'll find some options to make your life easier:
Explorer: This button simplifies finding different types of blocks within your blueprint. For instance, it groups all API blocks for easy navigation.Tags: Manage and create new tags with this button, allowing you to quickly understand a blueprint's purpose from the overview.Activate: When visible, this button activates the APIs, modals, and pages within the blueprint. By default, these elements are inactive until you hitactivate.Deactivate: When visible, this button deactivates the APIs, modals, and pages within the blueprint. Confirmation is required, and the action is audit-logged.Options: Access various functionalities like activating the console, viewing external function requests, accessing the audit logbook, removing the blueprint, and changing its color scheme.

Bottom bar: changes
Located at the bottom left side of your blueprint, you will notice several buttons that become active as you make changes:
undo your changes: Selecting this option will revert all your unsaved changes, restoring the blueprint to its most recent saved state.undo all changes: By clicking this, you can reverse all unsaved modifications, including those made by other collaborators.view recent change: This button allows you to sequentially review all open unsaved blocks and their respective changes.

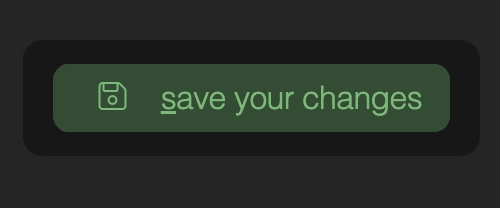
Bottom bar: save changes
On the bottom right side of your blueprint, several buttons activate as you implement changes:
save your changes: Using this button saves your current modifications, rendering the undo option unavailable. This action generates a new precompiled version of the blueprint and initiates deployment if the blueprint includes State UI pages, APIs, time-based events, or database events. You could also usectrl + sto save.